 Live subtitling basics
In this article:
![]() Transmitting subtitles in Live Mode
Transmitting subtitles in Live Mode
![]() Colour and vertical position overrides
Colour and vertical position overrides
Overview
This article describes the basics of live subtitling with Q-Live.
A live subtitling system is made up of the following basic modules:
-
Q-Live client workstation - used to edit, create and manage the subtitles
-
Q-Live Gateway - manages the connections between Q-Live client(s) and the subtitle transmission system(s)
Further modules may be used to extend and enhance the system:
-
Additional Q-Live client workstations
-
Q-Live File Server - enables multi-user access to Q-Live N32 subtitle files, allowing several users to work on the same broadcast simultaneously
-
Q-News Newsroom Interface - downloads running orders and scripts from a Newsroom System and creates Q-Live N32 subtitle files automatically
-
Wincaps Q4 DataStore - a central storage repository for shared subtitle metadata
Your Wincaps Q4 system may consist of a single-user workstation with a Q-Live client and Gateway. Or it may be a sophisticated multi-user system with many clients, a shared DataStore and interface to a Newsroom system. Your system administrator will be able to provide you with details of your particular system.
Working Modes
There are five working Modes available on the Q-Live Mode toolbar:
![]()
-
Edit Mode (F5) - used to manage the story running order and to create and time prepared subtitles for subsequent transmission
-
Fix Mode (F6) - used to quickly capture timecodes for a video clip
-
Replay Mode (F7) - (not currently used in Q-Live)
-
Live Mode (F9) - used to manually cue or replay prepared subtitles and for real-time live output via respeaking
-
Off Air/On Air (F10) - toggle connection to the live output device
Click a button on the Mode toolbar or press the corresponding key to select the desired mode. You can choose between Edit, Fix and Replay modes at will.
To enter Live Mode you must first be in Edit Mode as the Live button toggles between these two modes. The LIVE button turns red when active and the other modes are disabled..
You may go On Air in any mode but normally you would only do this in Live or Replay modes. The ON AIR button turns red when active.
Live pane
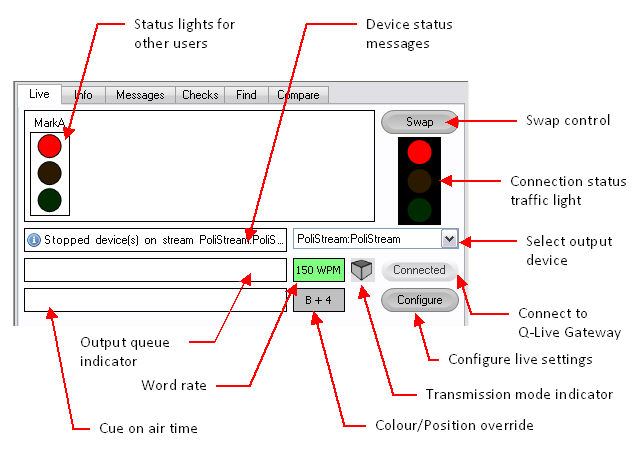
You should select the Live pane of the Toolbox whenever you are transmitting live subtitles. It allows you to configure and select the output device, view the status of the transmitted captions and swap control of the transmission stream with another user.
-
Configure live output settings - configure the location of the Q-Live Gateway and choose the live transmission mode and settings
-
Connect to Q-Live Gateway - make connection to the Q-Live Gateway
-
Select output device - choose the output device/group to use from the list of available devices/groups on the Gateway
-
Connection status traffic light - shows the status of the output connection
-
Swap control - lets you pass control of the output device to another user or receive control from another user
-
Device response messages - shows status (green) and error (red) responses from the output device
-
Status lights for other users - shows the status of other users connected to the same output device
-
Output queue indicator - shows the number of words or captions waiting to be transmitted
-
Cue on air time indicator - shows the on-air duration of the last cued block caption
-
Word rate - shows the current rate at which text is being transmitted
-
Colour/Position override - shows the current colour and vertical position overrides
-
Transmission mode indicator - shows the currently selected live transmission mode
Live output settings
![]() IMPORTANT: Since some of the Live output settings are stored per-customer in the DataStore, the current file MUST have an active customer assigned. If no customer is assigned then these settings will be greyed out and unavailable.
IMPORTANT: Since some of the Live output settings are stored per-customer in the DataStore, the current file MUST have an active customer assigned. If no customer is assigned then these settings will be greyed out and unavailable.
These options should be configured before entering Live Mode. You access them via the Configure button in the Live pane of the Toolbox. You can't change these settings whilst the output is On-Air. The options are split into four groups:
-
Live - customer - these configuration options are stored globally per-customer in the DataStore, i.e. when you open a N32 file, the selections automatically default to the last-used settings for the active customer.
-
Live - user - these preferences are stored per-user in the user's local settings file.
-
Speech Time - these preferences are stored per-user in the user's local settings file.
-
Gateway - these configuration options are stored globally per-customer in the DataStore.
Live - customer options
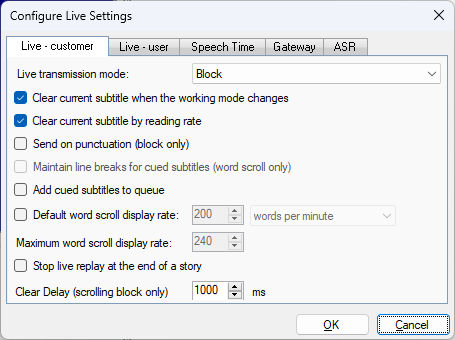
Q-Live offers the choice of five live transmission modes (not to be confused with the working Modes, i.e. Edit/Fix/Live) default setting is Block:
-
Block mode - multi-row/pop-on block display
-
Word Scroll mode - word-by-word scrolling text
-
Live Scroll, Cued Block mode - scrolling text for live output, block display for cued and replayed subtitles
-
Scrolling Block mode - word-by-word scrolling text until the subtitle block is full, then the block clears and the word-by-word scrolling restarts.
-
Live Scrolling Block, Cued Block mode - scrolling block for live output, block display for cued and replayed subtitles
Select the live transmission mode that is most suitable for your needs.
![]() Learn more about the Live Transmission Modes
Learn more about the Live Transmission Modes
If the Clear current subtitle when the working mode changes box is checked then the on-air subtitle (if any) will be automatically cleared if you change the working mode. Default setting is enabled/ticked.
If the Clear current subtitle by reading rate box is checked then on-air block subtitles will be automatically cleared after a period of time determined by the default reading rate. If this option is unchecked, then block subtitles will remain on air until they are cleared manually or replaced by another subtitle. This setting has no effect for scrolling output. Note: This option is not recommended for Closed Caption (Line 21) output. Default setting is enabled/ticked.
If the Send on punctuation box is checked then live-input block subtitles will be automatically split and transmitted whenever a sentence-ending punctuation character is received. This option only applies when you are respeaking in Live Mode. Default setting is disabled/unticked.
If the Maintain line breaks for Cued subtitles box is checked then line breaks in the subtitle file will be output to air. If the box is unchecked then line breaks in the file are ignored and words are output continuously, i.e. the live output will not take a new line until the row is full. This option only applies when you are cueing subtitles in Word Scroll mode. Option is only available when Word Scroll transmission mode is selected.
If the Add cued subtitles to queue box is checked then cued (block) subtitles in Block and Live Scroll, Cued block Modes will be appended to the transmission queue rather than immediately replacing the current on-air subtitle. Note that the Clear current subtitle by reading rate option must first be selected in order to enable this option. Default setting is disabled/unticked.
If the Default word scroll display rate box is checked then Q-Live will apply a different word rate to scrolling subtitles. You would typically use this option if you are working in Live Scroll, Cued block Mode and you wanted your (live) scrolling subtitles to appear more quickly than your (cued) block subtitles. See Setting the transmission rate for more details on how to control the output rate of subtitles. Default is 200 wpm and the default state is disabled/unticked with the value greyed out.
Maximum word scroll display rate value is set as a percentage in relation to the default word scroll rate and is for the word rate indicator in the Live section of the toolbox.
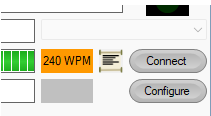
This display is also on the subtitle:
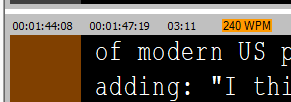
The colour indicator is explained in the Timing Rules reading speed. This option is linked to the Default word scroll display rate option and the value is greyed out by default.
If the Stop live replay at the end of a story box is checked then Live Replay will always stop at the end of the current story rather than automatically continuing on to the next story in the story list. Default setting is disabled/unticked.
The Clear Delay (scrolling block only) setting allows you to configure the time the full subtitle block remains on air before clearing and the next scrolled subtitle block begins. Default setting is 1000ms.
Live - user options
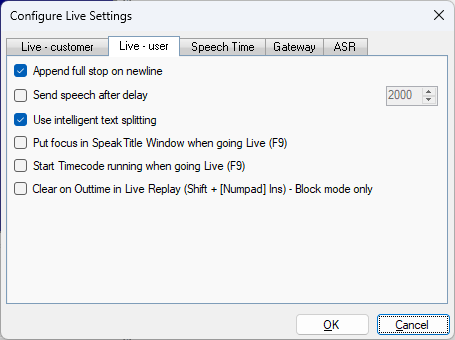
If the Append full stop on newline box is checked then live-input subtitles will automatically have a full-stop appended (if necessary) whenever a newline is triggered and the first word of the new subtitle will be automatically capitalised. This option only applies when you are respeaking in Live Mode. Note that it is possible to override this option by using Ctrl Return to generate the newline. Default setting is enabled/ticked.
The Send speech after delay box allows you to choose what happens to the last word in the current subtitle when you pause during live respeaking. If the box is unticked/disabled then the last spoken word will be held in the file and not transmitted live until more text is re-spoken. If the box is ticked then the last word will be automatically released after the configured delay (default is 2 seconds). Default setting is disabled/unticked.
The Use intelligent text splitting option allows Q-Live to split the text, according to the loaded Text Splitting rules, for live subtitling. Default setting is enabled/ticked.
The Put focus in SpeakTitle Window when going Live (F9) allows the User to immediately be ready for Live speech by placing the cursor focus in the SpeakTitle Window when going Live. This is only relevant with the Keyboard messages to SpeakTitle configuration. Default setting is disabled/unticked.
The Start Timecode running when going Live (F9) option starts the PC Clock running (assuming the PC Clock has been enabled) when the user puts the system into Live (F9) mode and stops when the user comes out of Live. Default setting is disabled/unticked.
Clear on Outtime in Live Replay (Shift + [Numpad] Ins) - Block mode only option clears the subtitle according to the outtime when a file has been set to playout using Shift+Numpad Ins when the transmission mode is set to Block mode. This is when the option to clear the subtitle by reading rate is not ticked/enabled. If the Clear on Outtime in Live Replay (Shift + [Numpad] Ins) option is not ticked/enabled and the Clear current subtitle by reading rate option is also not ticked/enabled then subtitles will clear on the next subtitles Intime. Default setting is disabled/unticked.
![]() NOTE: The Live - User setting 'Store Timecodes from Video Window' is now under the Configure>User Preferences>General button
NOTE: The Live - User setting 'Store Timecodes from Video Window' is now under the Configure>User Preferences>General button
The Store Timecodes from Video Window option should only be selected when the Clear current subtitle by reading rate option and the Add cued subtitles to queue option, from the Live - customer settings, are selected. If subtitles are cued out faster than the reading rate allows them to be on air, causing the subtitles to be added to the queue and released when the reading rate allows, then the timecodes will be altered to match when they are released to air. (when they appear in the Video Window).
If the Toolbox>Configure>User Preferences>Keyboard Jump to the next story when the last subtitle has been cued: has not been ticked (it is ticked by default) then the focus will remain in the last subtitle in the Story after it has been cued. Hitting 'Cue' (Numpad Ins) will not cue the subtitle again but move the focus to the first subtitle of the next Story.
Speech Time options
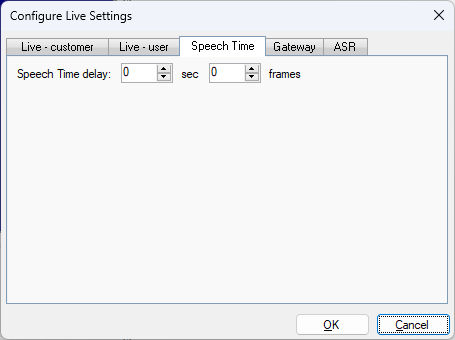
The Speech Time delay is used if you are capturing timecodes when respeaking in Live Mode. The value entered here is subtracted from the timecode source in order to compensate for the delay between respeaking and the text arriving in the current subtitle. Default values are zero seconds and zero frames.
Gateway
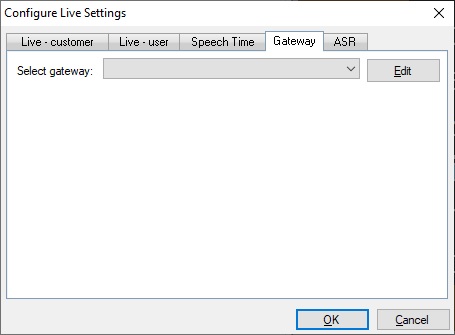
The Gateway configuration is explained in the main Q-Live Gateway section.
ASR
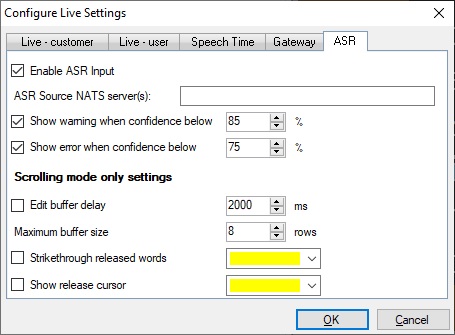
ASR input settings are explained in the ASR Configuration section. ASR Input is only available with Q-LiveASR.
Transmitting subtitles in Live Mode
You use Live Mode for transmitting subtitles to air and use On Air to connect to an output device via the Q-Live Gateway. You can connect to a single output device or a group of output devices. In the Live pane, once you are connected to the Q-Live Gateway, you can select the output device from the dropdown of your configured devices;
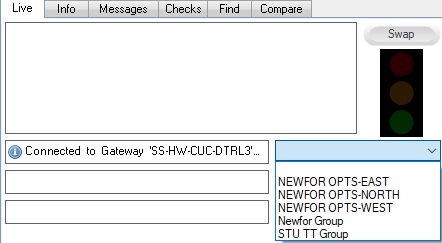
When you select the device or group and go On Air, the On Air button will go red:

and the you will see confirmation in the Live pane that the connection has been made to one or all the devices:
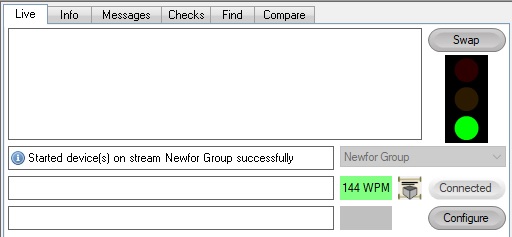
In Live Mode, the video window always shows the appearance of the current on-air text (caption).
![]() Note: if there are transmission problems further down the transmission chain, e.g. on the TV, then the first thing to check is the output on the video window, as this shows the appearance as it will appear on the screen. If this is correct that the problem is more likely going to be further down the transmission chain.
Note: if there are transmission problems further down the transmission chain, e.g. on the TV, then the first thing to check is the output on the video window, as this shows the appearance as it will appear on the screen. If this is correct that the problem is more likely going to be further down the transmission chain.
The appearance of the on-air captions depends on which of the five live transmission modes you have selected, i.e. block, word scroll, live scroll, cued block, scrolling block and live scrolling block, cued block.
There are three main techniques for sending subtitles to air:
1) Transmitting (Cueing) prepared subtitles:
By listening to the broadcast and watching the related story text, you can send the current subtitle to air at the appropriate moment by pressing the Cue key (Ins on the numeric keypad). The focus moves automatically to the next subtitle when the cue key is pressed. To clear the current on-air text without sending a new subtitle, press the Clear key (Del on the numeric keypad).
You can also 'grab' the timecode of each subtitle as it is cued for re-use.
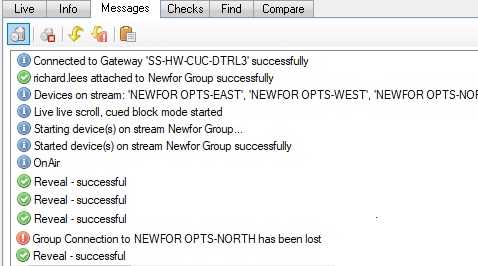
When a subtitle has been cued out successfully, there is a message saying the subtitle 'Reveal' has been successful.
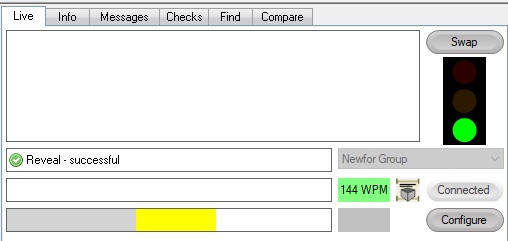
There is also a colour coded status bar that builds in line with the reading rate if no subtitle is cued.
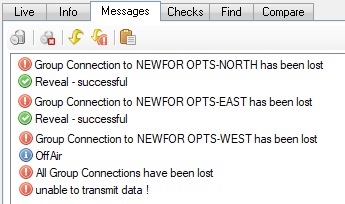
If a connection within a Group connection is lost, then the other devices will continue to work and at there will be a message in the Messages pane detailing which connection has been lost.
When all group connections are lost, Q-Live will go Off Air and the details will be in the Messages pane:
2) Replaying prepared subtitles with timecodes:
Click here to learn about Live Replay of timed stories.
3) Generating live unscripted subtitles:
Live Mode is also used to generate and send unscripted subtitles such as live reports or interviews. In this case, the subtitle text is normally generated by respeaking. Optionally, Q-Live allows a second user to correct the spoken text via the keyboard before it is released for transmission.
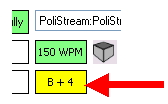
The appearance of the current subtitle changes when Live mode is selected. The word rate, colour/position override and cue on air time indicators from the Live pane are displayed at the top of the current subtitle, as shown below. This is provided as an aid to visibility for some types workflow.

Transmission indicators
Each subtitle display has a transmission status indicator ![]() that appears once the subtitle has been sent to an On-Air output device. If any of the subtitles in a story have been transmitted then the story itself will also display the
that appears once the subtitle has been sent to an On-Air output device. If any of the subtitles in a story have been transmitted then the story itself will also display the ![]() status indicator. TX indicators can be cleared via the Story : Status menu.
status indicator. TX indicators can be cleared via the Story : Status menu.
For a quick review of how many subtitles have been cued in a rundown you can use the Count Subtitles option.
Colour and vertical position overrides
Colour
See also Colour changes in Live Respeaking.
If subtitles are prepared in advance using Edit Mode then you can colour subtitle text at that time and the chosen colours will be used by default when the subtitles are cued out in Live Mode. However, you also have the ability to override the preset colours if necessary. You do this by pressing the normal colour keys as follows:
7 - white
8 - yellow
9 - cyan
/ - green
* - magenta
(these keys are located on the numpad)
When you override the colour in this way, the override colour is shown in the centre bottom of the Live pane. If no override colour is active then the display shows grey. To toggle the override colour off, simply press the key for the current override colour.
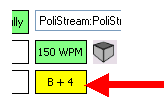
When Respeaking in Offline, when the Mic is On, the colour commands work differently to standard editing. Using the Numpad Colour Keys, the colour change will take effect after sentence ending punctuation using Integrated Dragon and will work as normal with SpeakTitle.
If you are cueing prepared subtitles, the colour change will take effect starting from the next subtitle that you cue out.
If you are generating live subtitles on-the-fly using speech input (i.e. the microphone is on), the colour override is not used. Instead, colour changes are delayed until the start of the next sentence. See Respeaking In Live
Vertical (raise) position
If block subtitles are prepared in advance using Edit Mode then you can raise the subtitle text at that time and the chosen vertical positions will be used by default when subtitles are cued out in Live Mode. Scrolling subtitles ignore any position information in the file and are always bottom-positioned by default.
However, you also have the ability to override the preset raise positions if necessary during live transmission. You do this by using the Enter key as follows:
-
Press Enter to force subtitles to the bottom raise position
-
Press Shift Enter to force subtitles to the top position
-
If the current override position is forced top, press Shift Enter to toggle the force position between top and top drop.
-
Press Enter again to cancel the override and return to using the default setting.
(Note that there is currently no way to force prepared raised subtitles to the bottom position).
The raise and drop positions are configurable on a per-customer basis.
When you override the position in this way, the override position is shown in the centre bottom of the Live pane as follows:
(no text) - use file setting
B + 4 - force bottom raise
T - force top
T + 4 - force top drop
Note that the colour and vertical position override information is also displayed at the top of the current subtitle when Live Mode is active.
See Also:
Capturing timecodes during a live transmission
Disable subtitles from transmission
